Powered by Blogger.

MY BANNER

MY BANNER
You may take this banner to your blog or group
Showing posts with label Tuts. Show all posts

Daydreaming

>> Monday, April 18, 2011


PSP 7, 8, 9, 10, 11 OR 12 and Animation Shop 3 (if you already have one) 
Tube of choose-I use Karen Middleton-Purchase CDO(Creative Design Outlet)HERE
Mura Meister/Copies and Penta.com -HERE
Foto Frame-HERE
Dignat font (special font)- I use  Border Corner 2  so I’m going to share with you which you can be found-HERE .  Impact and Vivalid


1.New Image 650x 350
2.On your layer. Paste as new layer. Effect/Mura Meister/Copies.  The settings are:


Click OK.
3.Color of your choose, I use #68323e . Click on Change To Target Brush and fill it with #68323e (make sure it’s at Forgehead. Not Background).
4.Adjust/Motion Blur. The settings are:


Repeat 2 times.  Effect/Edge Effect/Enchance More-Once.
5. Present Shape/Rectangle. Just drag along (see my tag).  Opacity slide to 59.  Add text, I use Impact. Just type anything you want to add. I add Daydreaming.  Effect/Penta.com/Jeans.  The settings are:


Click OK.
6.Copy your choose tube and on your layer, paste as new layer. Resize 75%-once (unless you don’t need to resize).
7.Layer/Merge Visisble.
8.For blinkie, you’re going to use special dignats. Border Corner 2 (dignats). Use cap T/size is 48 and background is FFFFFF. Magic Wand, selected inside the square (see my tag. DO NOT SELECT NONE!) and fill it from the tube of your choose. I use #d8c117, layer/new layer. Fill it in. Effect/Foto Frame. The settings are:

Select None. Merged Down. Effect/Mura Miester/Copies. The settings are:


On your Border Corner 2-Erase 1, 2, 3 and 4 off.  Rename Blinkie (or anything you name it). Duplicated. Image/Flip.


9.On top. Layer/new layer. Fill it with color of your choose. I use #9897a0. Selections/Select All. Modfty/Contract-pixels then hit delete on your keyboard. Select None. Drag top to bottom. Merge Down. 


10. Merged down blinkies (you just rename/duplicated). Once again, rename blinkie. Duplicate 7 times. You should have 8 layers. Hide the bottom. On first layer, view/Currently Only.  Selection/Rectangle. Just drag along (not outside).  Fill it with color of your choose. I use #9897a0.  Repeat duplicated until you get to 8 layers.


-Animated-


11.Open AS. Copy bottom from PSP, paste as new animation. On top, click duplicated until you get to 8 frames.


12. Copy first animated and back to AS, paste as new animation. Then go back to PSP and copy 2nd, then back to AS. Paste After Current Frame. Go back PSP, repeat until you get to 8 frames.


13. Select All (crtl A). Click right (on your mouse), Frame Properties, the setting is 25.  Make sure first one that you had copy earlier. Again select all. Same setting.


14.On animated-copy and on your tag, paste (crtl E). 
Make sure you add your copyright info as well as your watermark on your tag.


Save as gif. That is it!


Read more...

Spring Mushroom Garden

>> Thursday, April 14, 2011


PSP 7, 8, 9, 10, 11 OR 12 and Animation Shop 3 (if you already have one) 
Tube of choose-RAC-Purchase RAC Store-HERE 
Eye Candy 4000/Gradient Glow-HERE
Font of your choose. I use  Renaissance
Squirz Water Reflection(Animated Rain)-HERE
Creations by WitchysHeart-Fantasy Wonderland-Download HERE


1.New Image 650x 350
2.On your layer, Selections/All Select. Open paper 3 by WitchysHeart, copy and paste into selection on your layer. Select None.
3.Open Grass Element #2 by WitchysHeart. Copy and on your layer, paste as new layer. Resize if necessary (mine doesn’t need to resize). 
4.Open Mushroom Element #4 by WitchysHeart. Copy and on your layer, paste as new layer. Resize 55%, once. Move  to right and near where the grass element #2 is (see my tag).
5. Open Grass Element #1 by WitchysHeart. Copy and on your layer, paste as new layer. Resize 55%, once. Move it to near where the grass Element #2 is (see my tag).
6. Open Garden Gate Element #1 by WitchysHeart. Resize 55%, once and 75% once. Move to left side (see my tag). Move palette down to near raster 1.
7.Open Tree Element #1 by WitchysHeart. Resize 55%-once and 75%-once.  Move your palette down to near raster 5.
7.Open your Rac or choose. Copy and on your layer, paste new layer.  Resize 55%, once.  Move to right side.
8.Layer/Merge/Merged Visible.  New Layer, rename border. Fill from your tube of choose. I use #ffd78a.  Selections/Select All/Modifty-5 pixels. OK.  Hit delete on your keyboard.  Select None. Layer/Merged Visible. Save as. You name it and make it sure it save as PNG on your desktop (easy to find it).


-HERE COME FUN PART!-
Open Squirlz Water Reflection. Look for tag that you name it.  It will open it for you.


1.On your left side-click Start Creating Outlet.  Make sure you drag all along until you get to selected. *Make sure you selected inside the border (not outside border).


2.On your top-click Customize Rain/Snow (near Y).  The window will pop up and the setting are:


Ticked Within Outline ONLY
Number Of Raindrops/Snowflakes 50000
Length (rain only)-70
Brightness-180
Softness-100
Depth of Field-10
Width-2
Speed-1
Transparency -50
Direction Vaniation-0
Direction-213. Close red X


3.Click on Y.  Setting is at rain/snow only. Next to Y-See yellow arrow? Click on Yellow arrow. If you’re happy with it. On very top, click on gif (red bold font) and rename again. Open Animation Shop and once again, rename.


Make sure you add copyright/URL as well as watermark on your tag. 


For your name on your tag, I use Renaissance (depend on your size) and add Eye Candy 4000/Gradient Glow setting are
3.00/25/100-Black


Save as gif. That is it!


Read more...

Misty Christmas Morning

>> Monday, November 15, 2010


PSP 7, 8, 9, 10, 11 OR 12
Tube of choose-RAC-Purchase RAC Store-HERE 
Font of your choose. I use  BankGothic LT BT and StopD
Filters-Eye Candy 4000, Mura‘s Meister/Copies -HERE  
Your own picture or SXC image-HERE
Mask 20/20-HERE
Corner-I believe this corner belong to Mars, but her site is down for some reason, I think.  If you know who is this credit belong to (Please contract me-HERE. Thanks). Supply-HERE 


1.New Image 650x 250 and fill with black.
2.Open your own picture or from SXC image. On your layer. Activity top. Magic Wand/Selection/Rectangle. Drag as much as you can. Leave the marching ants on. On your own picture or SXC image. Layer/Mask/Load mask from Disk and add 20/20.  Layer/Merge/Merge Group.  Copy and on your canvas, Layer/new layer,  paste into selection. DON’T SELECT NONE!  Layer/new layer.  Fill with your own color choose. I use gradient (christmasy).  Selection/Modity/Contract-pixel 5. Hit delete on your keyboard.  Select None. Effect/3D/Drop Shadow.  The settings are:
Vertical-4
Horizational -5 
Opacity-53
Blur-5.00
Color-black
Repeat except Horiztional-  5.
3.Open Rac or your choose. Copy and on your canvas, new layer. Effect/Mura’s Meister/Copies. The settings are:
Wraparound (under Radom) and WallPaper (rotate) make it default (no change the setting). Adjust/Blur/Gaussian Blur-50.00. On your layer, opacity slide to 54.
4.Layer/new layer. Magic Wand-repeat from step 2. Fill with your color, gradient or pattern of your own.  DON’T SELECT NONE. Change to Target to match from your tube or your own picture.  Fill it. Select None. Present Shape-Rectangle.  Color, Gradient or Pattern of your choose.  I use #ffffff. Opacity slide to 46 or play with your prefer opacity.  Duplicated. Image/Flip. Merge/Merge Down. Text Tool-I use BankGothic LT BT and color, I use #000000 (black).  Convert to Raster layer. Just type Misty Christmas Morning or your choose text. Convert to Raster. Duplicated. Move it down (see my tag). Merge/Merge Down. Effect/Eye Candy 4000/Gradient Glow.  The settings are:
3.00/25/100-White
5. Pen Tool.  On your tool bar-Click Line and Polylines Width-3.00.  Forgeground-I use #ffffff.  Just draw across along. Convert to Raster layer. Duplicate. Move it down (see my tag). Merge Down. Duplicate once again. Move it a little all down.  *Once again, use Pen Tool-repeat except change to black. Draw across on rectangle. Repeat convert to raster layer. Duplicate.  Image/Mirror.  Repeat, merge down and move it down.
6. Present Shape/Rectangle. Drag across along.  I use #ffffff. Opacity slide to 68 or play with your own opacity.  Effect/Eye Candy 4000/Gradient Glow. Repeat step 5. See my tag.
7.Open tube of your choose.  Copy and on your canvas, paste as new layer. Resize if necessary. 
8.Open corner. Copy and on your canvas, paste as new layer. Put it on the corner where you made present shape earlier. Duplicate. Image/Mirror then Flip. Move it to the present shape. Layer/new layer. Fill with your color, gradient or pattern of choose. Select All. Selection/Modifty pixel 5. Hit delete on your keyboard. Add drop shadow if you prefer.  Merge/Merge Visible.
9. Add copyright information and URL as well as license numbers on your tag (if your tube is PTU). Eye Candy 4000/Gradient Glow-Repeat setting.
10.To add your name for your tag. I use StopD and color of your choose, I use #c30606. Size is 72 or your choose size as you prefer. 


*You can add avatar if you liked. 


Save as JPG or PNG.
Make sure you add copyright/URL as well as watermark on your tag. 

Read more...

AngelDevil Footer

>> Thursday, October 28, 2010


PSP 7, 8, 9, 10, 11 OR 12
Tube of choose-RAC-Purchase RAC Store-HERE 
Font of your choose. I use  FancyPants and Plantagent Checkrokee
Filters-Eye Candy 4000, Mura‘s Meister/Copies Mehdi/Sorting Tiles Xero/Soft Vignette -HERE  

1.New Image 650x 250 and fill with white.
2.Copy your favorite tube. I use RAC.  Paste as new layer. Mura’s Meister/Copies.  The settings are:
Radom-Default
Wrapround 
Blend-Default
Wallpaper (rotate)
Effect/Mehdi/Sorting Tiles.  The settings are:
Block-0-50
Block slide to 50
Ticked Plus
Effect/Edge Effect/Enchance-Default
3.Present Shape-choose rectangle and choose of your color, I use black (#FFFFF). Drag it along (see my tag). Opacity to 57 or play with your own opacity as you prefer. Effect/Blind.  The settings are:
Width-2
Opacity-55
White
Ticked Light from left/top
Duplicate and move it to bottom right upper corner (see my tag). Add text as you prefer. Add your favorite font. I use FancyPants, Size-48 Strokes/2.0.  Color of your choose, I use Black (#FFFFFF).  Again add text for Devil, same settings. Copy your favorite tube.  Resize if necessary.  Add drop shadow if necessary.
4. Activity 2nd layers. Layer/new layer.  Fill with color, pattern or gradient of your choose.  I use white.  Effect/Xero/Soft Vignette.  The settings are:
Gradient shape/Horizontal
Ticked shape
Effect type/Transparency
Pattern type/square dots
Repeats slide to 74
Width slide to 27
Height slide to 5
Strength slide to 255
Opacity slide to 58.
5. Layer/new layer.  Merge/Merge Visible/Merged. Layer/new layer. Fill with color of your choose.  I use #920202.  Selection/Select All.  Modifty/Contract pixel-5.  Hit delete on your keyboard. Select None. 
6. Add copyright information and URL as well as license numbers on your tag (if your tube is PTU). Eye Candy 4000/Gradient Glow-3.00/0/100.
7.To add your name for your tag. I use Plantagent Checkrokee and color of your choose, I use black. Size is 36 or your choose size as you prefer. Image/Rotate Free/Rotate left/90%.

*You can add avatar if you liked. 

Save as JPG or PNG.
Make sure you add copyright/URL as well as watermark on your tag. 


Read more...

Dark Spooky Night Footer

>> Thursday, October 21, 2010


PSP 7, 8, 9, 10, 11 OR 12
Tube of choose-I Jasmine Griffith-Purchase CILM-HERE 
Font of your choose. I use   Plantagent Check
Filters-Eye Candy 4000-HERE
Scrap Kits-Creation by WitchysHeart (Welcome back!)-Download from her blog (leave some loves!)-HERE


1.New Image 650x 250.
2.Selections-Select All. Open Paper #6 Creations by WitchysHeart.  Copy and on your canvas, paste as new layer. Select None.
3.Selection Tool-Rectangle, just draw along to half way.  Open Haunted House Element #1 Creations by WitchysHeart.  Layer/new laeyr. Copy and on your canvas, paste into selection.  Select None.
4. Activity bottom. Selection-Select All.  Open Paper #18 Creations by WitchysHeart.  Copy and on your paste into selection.  Select None. Activity middle. Opacity slide lowest to 45 or play with your prefer opacity. 
5. Activity top.  Open Cloud Element #3 Creations by WitchysHeart. Copy and on your canvas, paste as new layer. Resize 35%, once.  Move it over the haunted house.
6. Open Tree Element #1 Creations by WitchysHeart. Copy and on your canvas, paste as new layer. Resize 35%, once and 85%, once.  Move it over to middle near haunted house. Drop Shadow, the settings are:
V & H-1
Opacity 45
Blur-3.00
Color-white.
7.Open your favorite  tube. I use Jasmine Griffith. Copy and on your canvas, paste as new layer.  Resize if necessary.  If necessary, resize 55%, once or your choose resize as you prefer.
8. Layer/Merge Visible/Merged.  Selections-Select All. Open Paper #10 Creations by WitchysHeart or your choose color, gradient as you prefer.  Copy and on  your canvas, paste as new layer.  Selection-Modify/Contract/pixel-5.  Select None. Merge/Merge Down.
9. Add copyright information and URL as well as license numbers on your tag (if your tube is PTU). Eye Candy 4000/Gradient Glow-3.00/0/100.
10.To add your name for your tag. I use Plantagent Check and color of your choose, I use white. Size is 48 or your choose size as you prefer. 


Save as JPG or PNG.
Make sure you add copyright/URL as well as watermark on your tag. 

Read more...

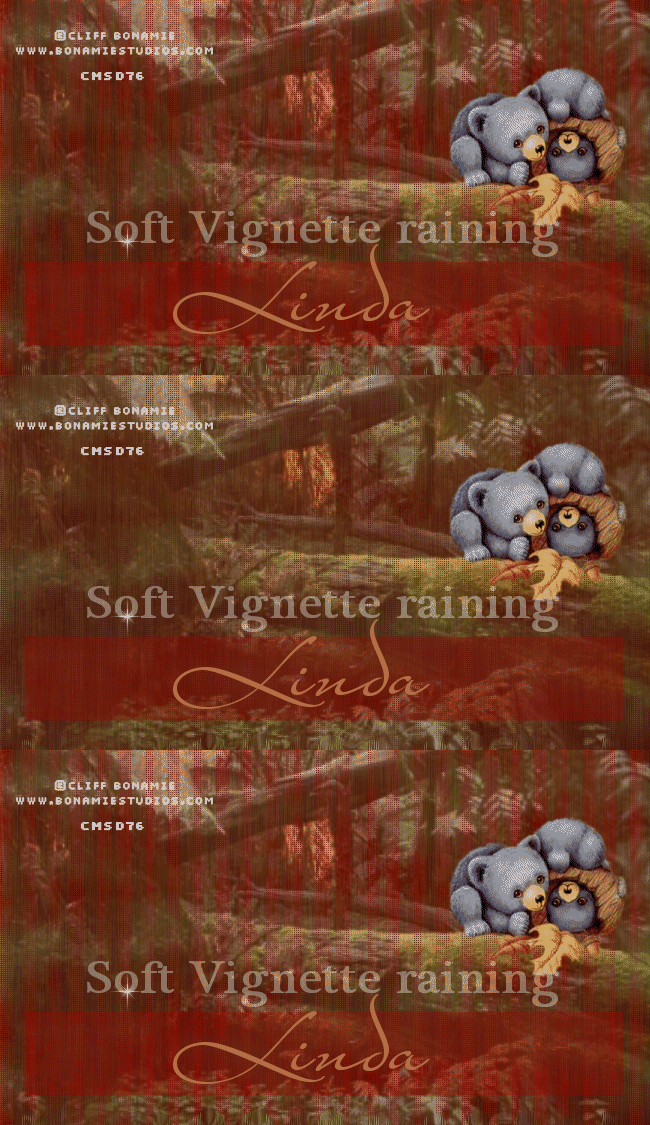
Soft Vignette Raining Footer

>> Friday, October 15, 2010


PSP 7, 8, 9, 10, 11 OR 12
Tube of choose-I use Cliff Bonamie (FTU tube included watermark)-Download-HERE
Font of your choose. I use   Plantagent Check
Filters-Xreo/Soft Vignette and Mura‘s Meister/copies and Eye Candy 4000-HERE
SXC Image-HERE


1.New Image 650x 375 and fill with white.
2.Layer/New layer, fill with gradient or your choose color. You can create any color of your choose if you prefer. Gradient/Angle-39/Repeats-11.  Make sure it’s at Linear. OK.  Fill it with gradient. 
3. Adjust/Blur/Radial Blur-Ticked Spin/Strength(%)-91, Ticked Elipical/Horizital offset(%)--10/Vertical offset(%)-27/Protect center(%)-30.  OK.
4. Effect/Mura’sMeister/Clouds-Default/Light-white/FG (middle)-#a57d4b and BG (bottom)-#9b0200
5. Open SXC Image-Image 2.  Selection/Select All. Layer/new layer. Copy Image 2 and on your canvas, paste as new layer
6. Add text on your canvas, just type whatever that inspiration you.  Font-I use Hot Pizza and IrisUPC/size 30. Color of your choose. Drop Shadow of your choose.  Selection/Select None.  Opacity to lowest 53.  Effect/Xreo-Soft Vignette.  The settings are:
Horizontal/Ticked Sharp. Transparency/Square dots.
Repeats/74
Width/27
Height/5
Strength/255
OK. Let’s learn how to make rain (real so simply!) Duplicated 2 times. You should have 3 layers. Activity bottom. Effect/Eye Candy 4000/Drip.  The settings are:
Width (pixels)-18.00
Maximum Length(pixels)-71.71
Spacing(pixels)-45.00
Taper-14
Dibble-48
Randon Seed-769.  Repeat middle and top. Activity bottom. Drop Shadow-V&H-2/Opacity-72/Blur-6.00. Color/Black. Repeat middle and top. Close Background and raster 1. Here is the fun part!  Activity bottom. Effect/Eye Candy 4000/HSB NOISE.  The settings are:
Hue Variation-5
Saturation Variation-5
Brightness Variation-9
Opacity Variation-0
Lump Width (pixels)-1.00
Lump Height (pixels)-42.00
Pattern-Smooth Lumps
Ticked Seamless Tile
Random Seed-1
Activity middle. Repeat HSB NOISE/except change to Hue Variation/2 and Saturation/2 and just click Radom Seed, once.
Activity top. Repeat HSB NOISE. Repeat Hue Varation/5 and Saturation Variation/5.  Click Radom Seeds, once. Close 3 layers.  Open Background and raster 1. Merge-Merge down.  Duplicate background 2 more times.  You should have 3 layers.  Close Copy of background and Copy (2) of background.  Open background and bottom. Layers/Merge/Merge Visible.  Close Merged. Repeat until you have all of 3 layers. Activity bottom. Copy and open AS 3.  Paste as new animation.  Go back to PSP. Activity middle. Repeat copy/back to AS 3,  paste After Current Frame.  Go back to PSP, copy top, repeat After Current Frame. Done with animation!


7.Present Shape-Rectangle.  Drag it along.  Size doesn’t matter.  I use dark red-#9b0200. Opacity to lowest 36.  Just play with your own opacity as you prefer.  Type anything you like.  For font, I use Plantagenet Check and I use white. Merge/Merge down. Copy and go back to AS 3, paste as new animation. On your AS 3, click Propagate Paste, copy.  Edit/Into Selected Frame.
8.Back to PSP. Layer/new layer. Add any brush as you prefer. Copy, repeat AS 3.  
9.Open your favorite tube. I use Cliff Bonamie.  Resize if necessary. Copy and back to AS 3, repeat. 
10. Add copyright information and URL as well as license numbers on your tag (if your tube is PTU).
11.To add your name for your tag. I use Mr. Lockbroughts and color of your choose, I use #b46f46. Size is 72. 


Save as JPG or PNG.
Make sure you add copyright/URL as well as watermark on your tag. 

Read more...

Delicious Autumn Sets

>> Friday, September 10, 2010


PSP 7, 8, 9, 10, 11 OR 12
Tube of choose-I use Jasmine Becket-Griffth.  CILM-HERE
Mask of your choose. I use 20/20-HERE
Font of your choose. I use  Hot Pizza, IrisUPC and Plantagent Check
Filters-PhotoEffex/Scanline and Mura‘s Meister/copies and Eye Candy 4000-HERE
SXC Image-HERE

For Footer


1.New Image 650x 250 and fill with black.
2.Open Image 2.   Layer/Load Mask from Disk/20/20. Merge/Merge Group. Copy and on your canvas, paste as new layer.   Rename image. Move it to left side.
3.Selection/Select All.  Layer/New layer. Rename BG. Let’s make simply gradient.  Click on foreground and click on gradient, edit/new.  Just type whatever you feel like really inspiration you. Click on Fore arrow-click/custom. I use B05F3C.  Again, click on back arrow/custom. I use FFB60B.  Click close.  Window pop up and ask you if you want to use new gradient.  Just click yes.  Gradient/Angle-0 Repeat-6.  Make sure unticked invert.  Click OK.  Fill it with gradient.  Select None.  Drag it under raster 1. Opacity to 65.  Effect/PhotoEffex/Scanline-default.
4. Activity raster 1. Copy tube and on your canvas, paste as new layer. Effect/Mura’s Meister/copies. Default. Adjust/Radical Blur. The settings are:
Blur-
Strength (1%)-41
Twirl degree-10
Eliptical-ticked
Center
Horizontal offset (%)-54
Vertical Offset (%)-0
Protect center (%)-0
Click Ok. Drag it under raster 1.
5. Activity top. Copy your tube and on your canvas, paste as new layer. Resize if necessary.
6. Add text on your canvas, just type whatever that inspiration you.  Font-I use Hot Pizza and IrisUPC/size 30. Color of your choose. Drop Shadow of your choose.  
7.Layer/New layer.  Selection/Select All.  Fill it with black. Modifty/Contract-pixie-3.  Hit delete on your keyboard.  Selection/Select None. Drop Shadow of your choose. I use 2/2/40/4.00/white. Give it a little bit light shadow.  Merged.
8. Add copyright information and URL as well as license numbers on your tag (if your tube is PTU). Eye Candy 4000/Gradient Glow/3.00/0/100-Fat-White. 
9.To add your name for your tag. I use Plantagenet Check and color of your choose, I use #951515. Size is 40. Repeat Gradient Glow, same settings.

For Avatar

1.New Image 100 x 100. Fill with black.
2. Layer/New layer. Repeat gradient and fill with gradient
3.Adjust/Blur/Gaussian Blur-20.00.  OK.
4. Copy your tube. Resize 25%, once. Repeat Mura’s Meister/copies. Resize  Same settings.
5. Repeat Adjust/Effect/Radical.  Same settings.
6.Copy your tube. Resize 25%, once.  Move it to left.
7. Layer/new layer.  Selection/Select all. Fill with black. Repeat Modifty/Contract-pixie 3. Hit delete with your keyboard. Selection/Select None.  Merged.
8. To add your name on your tag.  Repeat font and repeat size.  Repeat Gradient Glow, same settings.

Save as JPG or PNG.
Make sure you add copyright/URL as well as watermark on your tag. 


Read more...

Magic Mushroom Wonderland

>> Friday, August 20, 2010


PSP 7, 8, 9, 10, 11 OR 12
Tube of choose-I use Karen Middleton.  CILM-HERE
Mask of your choose. I use 20/20-Download HERE
Font of your choose. I use  Plantagent Check
 Filters-
Eye Candy 4000/Gradient Glow-Here
Scrap kit-
Creations by WitchysHeart-Download from her blog and Leave some loves on her shoutbox(scroll a little it down to Fantasy Wonderland)-Download-HERE


1.New Image 650x 250 and fill with black.
2.Open Water Fall.   Layer/Load Mask from Disk/20/20. Merge/Merge Group. Copy and on your canvas, paste as new layer.   Rename image. Resize 35%, once. Move it to left side.
3.Open Paper #3 by WitchysHeart. Activity background. Selection/Select All. Copy paper and on your canvas, paste into selection. Select None. Rename blue and green.
4.Activity blue and green.  Open Mushroom #1 by WitchysHeart. Copy and on your canvas, paste as new layer.  Move it near the image (see my tag).  Resize 35%, once and 75%, once.
5. Open Grass Element #2 by WitchysHeart. Copy and on your canvas, paste as new layer.  Resize 35%, once.  Move it to right side.
6. Open Mushrooms Element #4 by WitchysHeart. Copy and on your canvas, paste as new layer. Risize 35%, once.  Move it to right side (see my tag).
7.Open Tree Stump #1 by WitchysHeart.  Copy and on your canvas, paste as new layer.  Resize 35%, once.  Put it in the middle (see my tag).
8.Open Flower Element #10 by WitchysHeart.  Copy and on your canvas, paste as new layer.  Resize 35%, once and 75%, twice.  Move it near the stump and grass (see my tag). 
9.Activty top.   Copy your favorite tube and on your canvas, paste as new layer. Resize if necessary. 
10. Layer/new layer.  Select All.  Open Paper #4. Copy and on your canvas, paste into selection.  Selection/Modifty/pixie 5.  Hit delete on your keyboard.  Select None.  Drop Shadow of your choose.  Layer/Merge Visible/Merged.
11. Add copyright information and URL as well as license numbers on your tag (if your tube is PTU). Eye Candy 4000/Gradient Glow/3.00/0/100-Fat-White. 
12.To add your name for your tag. I use Plantagenet Check and color of your choose, I use #951515. Size is 48. 
Save as JPG or PNG.
Make sure you add copyright/URL as well as watermark on your tag. 

Read more...

  © WitchysHeart Tweaked it by Ourblogtemplates.com 2008

Back to TOP